
I'm a 90's Chick!

I've been working on this one on and off for weeks now. I finally finished it, and I wanted to show you what I accomplished.

This was a $2.00 score! It really doesn't get much better than that!

This fabric was so soft! It was in great condition! Buttons up the back, weird side ties. Droopy arm holes.
It was HIDEOUS!

Right up my alley!


I then realized I was wearing it backwards! The buttons were supposed to be down the front. 
Oh well, I like it better this way anyhow.

Did I mention this has pockets????


I took up the shoulders about 2 inches.
 I Stitched those shoulders, then snipped off the extra fabric.
That made the arm pit droopiness considerably better!

It needed some length taken off the bottom too, so that got a snip, (about 7 inches of snip!)
 Those goofy side ties came off too.
Snip! Pick!

With the seven inch bottom scrap, I fashioned a kind-of-sort-of-sleeve from a dress pattern.
It didn't quite fit the pattern, but I did what I could.


I sewed the sleeves onto the dress, and they were more like
 cap sleeves, but that will do just fine.

There was still too much of the frumpiness, so I needed to take the dress in at the sides a bit more.
I was worried about losing the pockets, because a girl's gotta have her phone ya know?

I pushed on.....

To be honest, this dress sat for about a week because I was frustrated about the pocket situation. 

I decided to leave the bottom of the dress alone, but then
 I took in the bust area about another inch on each side.

I used a dress that fits well to roughly measure the distance to take in.

I kept the pockets!!

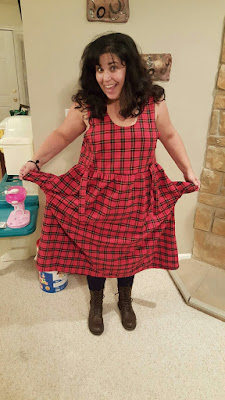
I threw on a belt and some black boots, and I was ready for the day! 
My peanut took my after pics for me! 
She's getting good at it!


Much better If I do say so!


See you next time!


Comments

Popular posts from this blog

Graduation Gown not just for Graduates Anymore

This discarded, and loved-no-more graduation gown was calling to me from the thrift store rack. It was perfect for this time of year when teachers say goodbye tearfully to some, and not-so-tearfully to others.  But we love them all anyway.  Heeeeey!  Over here!  Buy me and give me a new life!! So I did. Sally liked the dress much better once I picked off those sleeves! She thought it was a perfect resting spot. I chopped the bottom a bit, folded it twice because it was fray-fray-central, and I hemmed it all up.  I could use the chopped off bottom piece as a belt  or use an existing one.  Choices.... The dress is all white so this time, I decided to go with a darker brown belt,  and some metallic sandals. Congrats and good luck  to all the 2015 graduates!  I'm ready for the ceremony! See you next time!

Lisa's Sew Along with Cassie! Part ONE

  My awesome teacher friend Cassie Stephens, has a great Art Teacher blog. She is an amazing artist, teacher, and she sews too! Cassie had this great idea to start a sew-along. Check out her amazingness at www.cassiestephens.blogspot.com I will be sewing an art apron with her tutorials right along side her. This is my progress so far:   Cassie is all professional and stuff making a pattern for her apron, but I just went ahead and traced an existing one.   Trace and snip! This Apron will end up being reversable! My Grams gave me some amazing fabric, so I am putting it to use for this reversable apron. Thanks Grams! I love you bunches! Very patriotic. Both sides cut. My Grams gave me that electric blue fur fabric, and I thought it would be  super awesome for a pocket. Who doesnt like furry pockets?   I had some of that cute kitty fabric left over from my teacher dress. Check out my Art Teacher Dress H...

Lisa's sew along with Cassie Part II

I continued to sew the pockets for each side, and I had a beautiful red and white scarf from Grams that I thought would be perfect for the neck.  One side. And, the other. I put the scarf in the middle of the two sides. (RSF)       Hi Scarf! Then I pinned it down, so just the bottom of the scarf was sticking out the top. The scarf was safely tucked inside. I did the same thing to add the grossgrain ribbon for the ties on the side. I flipped it right side out, and sewed the bottom together. One side.   And, The other!   Detail of the ribbon. Mixing those patterns! Hanging on my office door, ready to go!